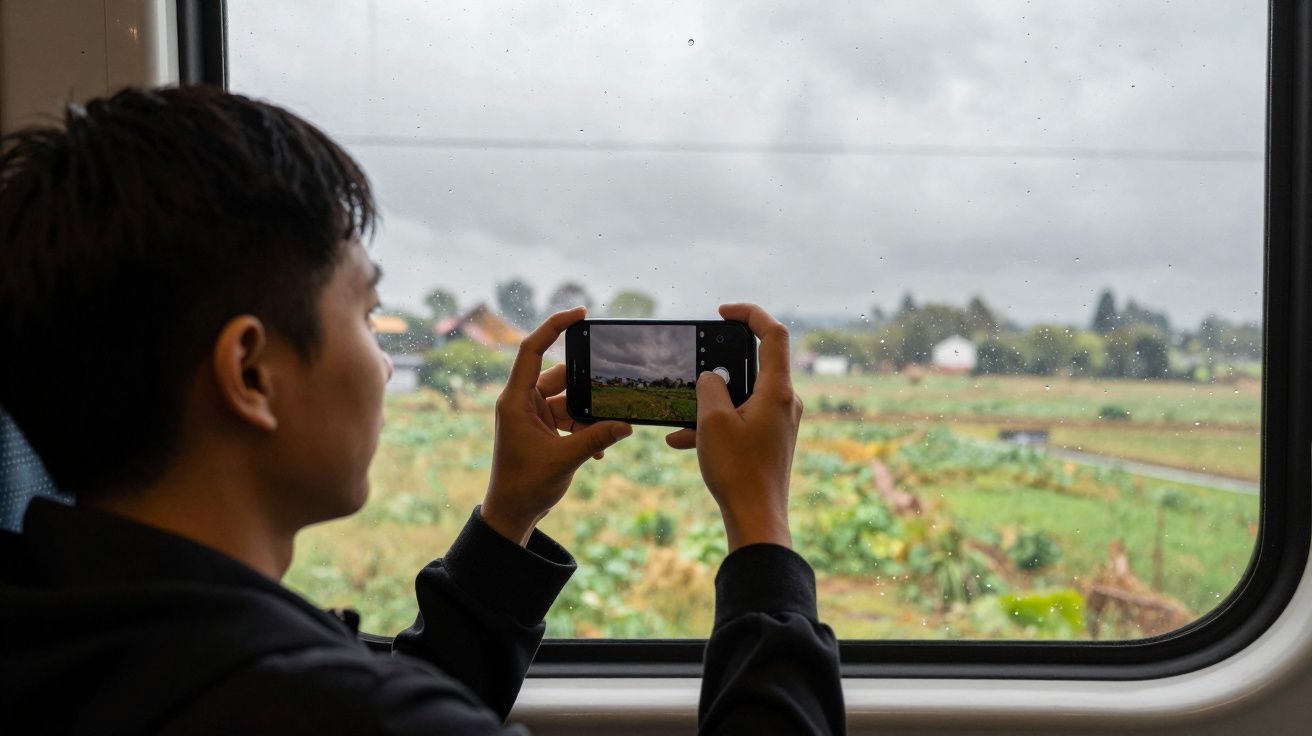
You’re somewhere between Euston and a wet weekend in the Lakes, forehead pressed to the train window. The fields outside are a flat wash of slate and olive; your mate is dozing in the next seat, hood up, coffee cooling in the cup holder. You lift your phone, frame the scene, tap the shutter. On the screen it looks… fine. Then you look again. The sky is a muddy grey lid, the greens are lifeless, your friend’s face has gone a sort of blueish beige.
You flick the brightness up. You scroll through filters called “Vivid” and “Cool” that somehow make everything look both harsher and more washed out. The original moment felt soft and atmospheric. The photo looks like it’s been left in a lukewarm puddle.
Hidden in that disappointment is a very specific culprit: the way your phone decides how bright and how “warm” a photo should be when the world outside is fifty shades of drizzle.
There is a simple setting that can change this in a second. The same one travel bloggers quietly nudge every time they land in a grey UK winter and still manage to post shots that look like a mood, not a mistake.
Why grey UK light makes your phone flatten everything
Your phone isn’t seeing what you’re seeing. It’s doing maths.
Every time you point it at a scene, a tiny meter guesses how bright the photo should be on average. Its gold standard is a mid-grey. Snowy field? It darkens it towards grey. Night street? It brightens it towards grey. The problem on a UK winter’s day is that the whole world already is mid-grey.
So your phone plays it safe. It protects the dull sky from “blowing out” by nudging the whole exposure down. The result is that pavements, faces, brickwork and trees get dragged into the murk. Algorithms often cool the white balance as well, turning soft daylight into something that feels like strip lighting in a bus station.
Our eyes compensate automatically. We feel the warmth of your friend’s coat, the depth in the clouds, the subtle greens in the moss on a Manchester wall. Your phone just sees a big grey average and quietly turns your memory into a gloomy receipt.
Camera engineers will tell you: the sensor isn’t bad, the decision is. Leave everything on full Auto, and dull days are where phones panic the most.
The simple setting travel bloggers change first
Here’s the shift: stop letting Auto have the last word on brightness. Use exposure compensation – that tiny brightness slider that appears when you tap to focus – and bias it in your favour on grey days.
Most travel bloggers don’t shoot “as is” when the sky looks like wet paper. They almost always:
- Tap on the main subject (a face, a building, a cup of coffee).
- Slide the exposure up a little, usually around +0.3 to +0.7.
- Often nudge the image slightly warmer, either with a “vivid/warm” photo style or later in a quick edit.
The core move is that first one: deliberately overexposing the scene by a small amount compared to what Auto wants. It sounds technical. In practice, it’s a thumb movement you can do in less than a second.
On a grey Cornish beach, that slight lift suddenly brings life back to the sand and sea. On a late-afternoon London street, it pulls detail out of coats, faces and bricks instead of worshipping the sky. The whole frame looks closer to how it felt to stand there.
How to do the “tap, lift, lock” routine in under 10 seconds
Every modern phone has some version of this, even if it’s hidden behind a tiny icon. Think of it as a short ritual you run every time the weather looks like porridge.
1. Tap
Point your phone at the scene and tap on what actually matters – usually a face or the building/coffee/table you care about. This tells the camera: this is home base for focus and brightness.
Watch what happens. The image jumps slightly brighter or darker as the phone recalculates around your tap point instead of the grey sky.
2. Lift
Right next to that focus box, most phones show a small sun icon or a vertical line. That’s your exposure slider.
- On iPhone: tap to focus, then slide your finger up to brighten, down to darken.
- On many Android phones (Samsung, Pixel, etc.): tap to focus, then drag the little sun icon up or down.
On a grey day, lift it until the scene looks like it does to your eyes, then *one tiny notch more*. You’re usually aiming for:
- Skies that might be a bit pale, but not pure white everywhere.
- Faces that look alive, not dusky or blue.
- Pavements, stone and grass with visible texture.
Don’t chase perfection. You’re just undoing Auto’s instinct to play safe and dark.
3. Lock
If you’re taking more than one shot (you almost always should), you can stop the camera from jumping back to its default:
- On iPhone: long-press until you see AE/AF LOCK. Your focus and brightness stay fixed until you tap elsewhere.
- On many Android phones: look for a small padlock icon after you tap to focus, or a “Lock AE/AF” prompt.
Now you can reframe slightly – step closer, tilt down to crop out some sky, get your coffee cup out of the dead centre – without the exposure sliding back to dull.
A whole series of shots on a grey Brighton pier suddenly looks like a set from a travel feature, not a council leaflet.
Tiny tweaks that multiply the effect
The exposure lift is the main move. A few small habits around it make your “grey day” photos look like they belong on a blog rather than a bin.
- Aim a little lower. If half your frame is flat cloud, your phone will keep dragging the exposure down. Tilt slightly so more of the scene is buildings, people or ground. You’ll still get the mood of the sky without letting it boss the meter.
- Choose a warmer look once, not a filter every time. On newer iPhones, pick a Photographic Style like “Rich Contrast” or “Warm” and stick with it. On Android, enable any “Vivid” or “Optimised” photo profile you like the look of. This gently warms colours on every shot, which flat light really needs.
- Use HDR, not flash. Leave HDR/“Auto HDR” on; it helps squeeze detail out of grey skies and darker streets at the same time. Turn the flash off unless it’s actually dark – on overcast days it just nukes faces and flattens everything further.
- Clean the lens. A rainy walk in York plus a greasy phone pocket is a fog machine. A quick wipe with a dry corner of your T‑shirt can add more clarity than any filter.
Let’s be honest: nobody will remember to do all of this every single time. But if you tie it to a moment – “whenever I open the camera and the sky looks miserable, I tap, lift, lock” – it becomes second nature by your next city break.
A simple checklist for grey-day shots
Here’s the quick routine travel creators fall back on when the UK sky refuses to cooperate:
- Spot the dullness. If the scene looks flat to your eyes, assume Auto will make it worse.
- Tap on what matters. Face, building, plate of food – not the sky.
- Lift exposure slightly. Around +0.3 to +0.7 on the slider, just until it feels alive.
- Lock if you’re taking several. Stop the camera re-thinking every frame.
- Tilt and tidy. Lose some empty sky, tidy the edges, shoot a small burst so you can pick the keeper later.
You don’t need a new phone. You need to tell the one you’ve got to stop being so polite about the weather.
Key moves at a glance
| Point clé | Détail | Intérêt pour le lecteur |
|---|---|---|
| Lighter exposure on dull days | Tap to focus, then slide the exposure/brightness up a notch | Stops Auto underexposing grey scenes and makes photos match how it felt |
| AE/AF lock | Lock focus & exposure once you like how it looks | Lets you reframe without the camera dragging everything back to flat |
| Warmer, vivid profile | Set a slightly warm/vivid style as your default look | Adds subtle colour and mood without heavy filters or long edits |
FAQ:
- Won’t brightening the photo just blow out the sky?
Sometimes the very brightest part of a grey sky will go pale or white, and that’s fine. On overcast days, the sky usually isn’t the story. If it looks too empty, tilt down a little or lift the exposure less aggressively.- Can’t I just fix it later with editing apps?
You can lift brightness in editing, but doing it at the moment of capture keeps noise lower and colours cleaner, especially on cheaper phones. The better the base photo, the faster and nicer any edits will look.- Does this work at night too?
At night your phone is already struggling for light, so cranking exposure further can add blur and grain. The “tap, lift, lock” trick is most helpful in daytime flat light – cloudy afternoons, drizzle, foggy mornings.- My phone doesn’t show a sun icon. What now?
Check for a “+/-” button, a “Pro” or “Expert” mode, or a tiny slider that appears when you tap to focus. Nearly all smartphones hide exposure compensation somewhere. If in doubt, search “[your phone model] exposure slider”.- Should I use the same exposure boost everywhere?
No. Think of the numbers as a starting point. +0.3 might be enough on a bright-but-cloudy seafront; you may push a little higher in a dark alley or shaded street. The goal is simply: no more sad, underexposed grey.


Comments
No comments yet. Be the first to comment!
Leave a Comment