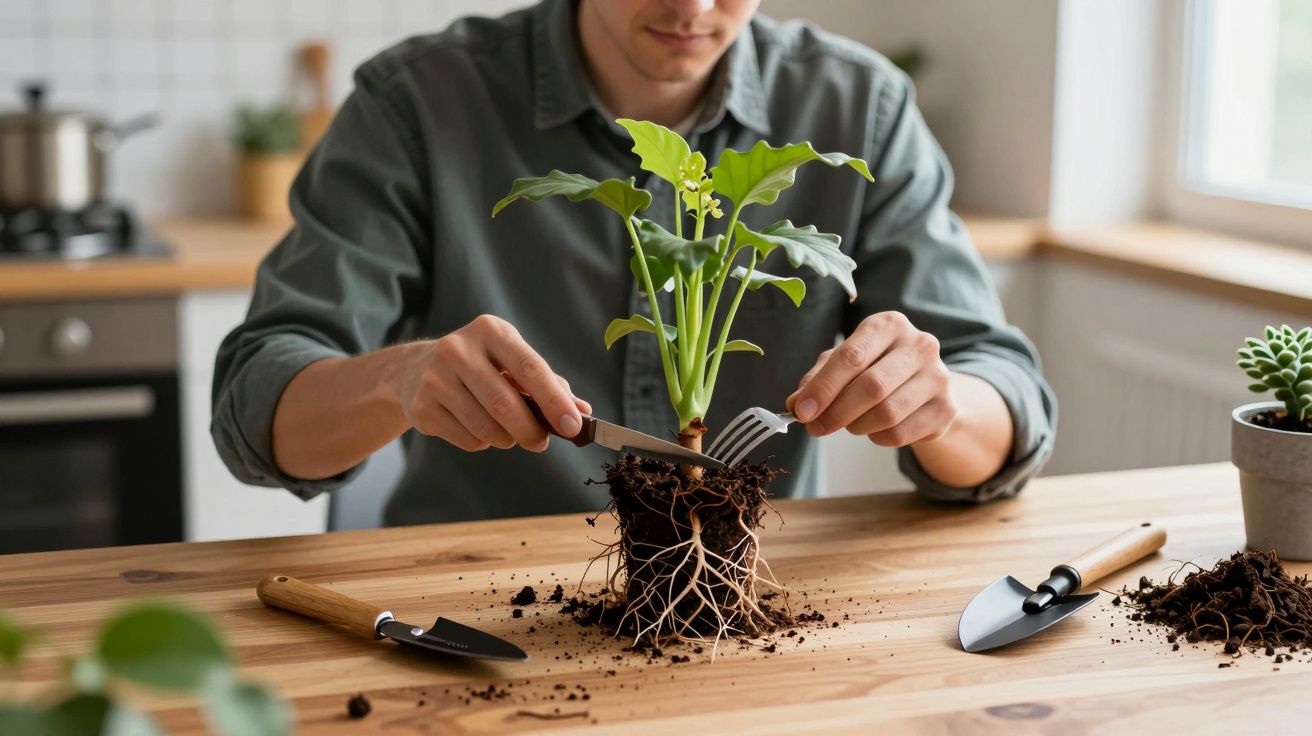
When a plant keeps wilting, even though you are watering on time, most people reach for the fertiliser or blame the compost. Then, one day, you slide the plant out of its pot and see it: a white‑grey knot of roots spiralling round and round, with almost no compost left. The plant is alive, but it is essentially wearing a straitjacket.
At that moment many gardeners assume only one cure exists: a bigger pot and a full repot. That works, but it is not always convenient if you are short of space, compost, or time, or you simply like the pot your plant is in. Nursery growers quietly use another option: a brisk “root surgery” with something as ordinary as a kitchen knife and fork.
Handled properly, that quick intervention frees circling roots, restarts growth, and buys your plant another season or two in the same container. It looks brutal, yet done with a light hand it is often kinder than leaving a plant to slowly choke itself.
You are not “attacking” the roots. You are helping them break the habit of circling and encouraging fresh, outward growth again.
Why roots end up circling the pot
In a container, roots keep searching for space. When they reach the smooth wall of the pot, they turn and follow it. Over months or years, those loops build into a tight coil.
A few situations accelerate the problem:
- Plants left in the same pot for several seasons with no root work.
- Nursery plants grown fast in warm tunnels, then never teased out when bought.
- Peat or fibre plugs from young plants that were dropped, still intact, into larger pots.
- Hard plastic pots with glossy sides that offer no grip for roots to branch into.
Eventually, roots can fill so much of the volume that compost becomes a thin film between them. Water runs straight down the sides, fertiliser never quite reaches the centre, and the plant stalls.
How to tell if it is time for a rescue
Not every plant with visible roots needs surgery. Some species, especially many houseplants and grasses, tolerate quite crowded pots. Watch for a cluster of clues rather than just one symptom.
Typical warning signs:
- Roots poking from drainage holes or lifting the plant above the rim.
- Water racing through the pot and out the bottom within seconds.
- The compost pulling away from the pot sides, leaving a clear gap.
- Growth that has slowed or stopped, with tired, yellowing lower leaves.
- A plant that dries out far faster than its neighbours in similar light.
If you gently slip the plant out and see thick, circling roots with very little loose compost, it is root‑bound. If there is still a good amount of crumbly mix between roots and they spread evenly, you can usually wait.
If the rootball looks like a tightly woven basket, the knife‑and‑fork method is on the table.
The knife‑and‑fork rescue: step by step
You can do this on the patio or over a tray on the kitchen table. The aim is simple: open the rootball, create breaks in the circling pattern, and add fresh compost, all without changing pot size.
1. Gather your tools
You do not need specialist kit. Clean and sharp is more important than fancy.
- A sturdy kitchen knife or garden knife.
- A dinner fork or small hand fork.
- Disinfectant or methylated spirit to wipe metal surfaces.
- A small bucket or trug for loosened compost and root pieces.
- Fresh potting compost to tuck around the sides and base if needed.
Wipe blades with disinfectant between plants, especially if you suspect any disease.
2. Ease the plant out and inspect the roots
Water lightly an hour before you start, so the compost is damp but not soggy. Turn the pot on its side, support the stem, and slide the rootball out. Tap the rim if it sticks.
Look at three things:
- How thick are the roots around the outer 1–2 cm?
- Is there a dense pad of roots at the base?
- Does any loose, healthy compost remain in the middle?
On very pot‑bound plants, the outer layer and base will look like felt. That is where your work will focus.
3. Make vertical cuts with the knife
Hold the rootball upright. Using the knife, slice down from top to bottom, just deep enough to cut through the circling outer roots.
- Make 3 to 6 evenly spaced cuts around the sides.
- On small pots, cuts are often 5–10 mm deep.
- On bigger containers (25–30 cm and up), they can be 1–2 cm deep, but avoid going all the way to the centre.
A simple guide:
| Pot size | Depth of vertical cuts |
|---|---|
| Up to 13 cm diameter | 5 mm or so |
| 15–25 cm diameter | 5–10 mm |
| 30 cm+ containers | 10–20 mm, staying clear of the core |
These cuts break the looped roots and encourage new ones to grow out through the “wounds” into the compost.
Think of it as scoring a loaf of bread before baking: shallow cuts that guide how it expands.
4. Use the fork to tease the outer roots
Now switch to the fork. Starting at the base, gently comb the roots outwards.
- Work from bottom to top, loosening the mat so roots stick out rather than cling to the old shape.
- Shake or pick away small clumps of exhausted, dry compost.
- Do not worry if a few fine roots snap; they quickly regrow.
The aim is not to strip the rootball bare, but to break that smooth “pot imprint” on the sides and base.
5. Trim any thick root pad at the bottom
If the base has formed a solid mass, you can remove some of it to give space back.
- Slice off up to 1/4–1/3 of the bottom layer with the knife.
- Avoid going higher than that in one go, or you risk shocking the plant.
For tough, fibrous roots (lavender, rosemary, grasses), you may need a firm sawing motion. For fleshy roots (hostas, some houseplants), work more carefully to avoid tearing large chunks.
6. Refresh the compost and re‑pot in the same container
Check the drainage layer at the bottom of the pot and clear any clogged holes. Add a little fresh compost to replace what you trimmed off.
- Stand the plant back in, now that the rootball is slightly shorter.
- Pack fresh compost around the sides, gently firming so there are no air gaps.
- Keep the original soil level. Do not heap compost up the stem or trunk.
If you truly cannot remove the plant (very tall, heavy, or woody), you can still help:
- Push the knife down the inside edge of the pot in 4–6 places to create slots.
- Use the fork on the surface to scratch away the top 2–3 cm of tired compost.
- Backfill the slots and surface with fresh mix, then water in.
7. Water and let the plant settle
Water slowly until it runs from the drainage holes. This helps settle new compost around the roots and washes fine particles into contact with the fresh cuts.
Keep the plant out of harsh midday sun and strong wind for a week or two. You want it concentrating on new root tips, not scrambling to keep up with heavy transpiration.
Which plants love this, and which ones to treat gently
Most everyday potted plants cope well with this treatment when done outside their peak stress moments (for example, not during a heatwave or right before flowering).
Generally suited to knife‑and‑fork rescue:
- Many houseplants: pothos, monstera, peace lily, spider plant, rubber plant.
- Herbs and small shrubs in containers: rosemary, thyme, lavender, fuchsias.
- Fruit and veg in pots: tomatoes, chillies, strawberries, small citrus.
- Grasses and clump‑forming perennials: carex, hostas, daylilies.
Treat with extra caution or a lighter touch:
- Orchids in bark: they prefer gentle root trimming and fresh bark, not heavy scoring.
- Cacti and succulents: they dislike root disturbance when actively growing; use only minimal loosening.
- Very woody shrubs and trees that have been pot‑bound for many years; sometimes a true repot or root pruning into a larger container is safer.
- Recently potted‑on plants: they need time to knit into new compost before being disturbed again.
When in doubt, start with fewer, shallower cuts. You can always repeat the process next season.
Common mistakes to avoid
A little restraint makes the difference between a helpful reset and a major setback.
- Cutting too deeply into the core of the rootball and removing most of the fine roots at once.
- Doing it in extreme heat or cold, when the plant is already stressed.
- Over‑fertilising immediately afterwards; fresh cuts are sensitive to strong feeds.
- Ignoring watering changes: a loosened, refreshed rootball may hold moisture differently from before.
After surgery, the plant will often pause growth for a couple of weeks, then push a flush of new leaves as the fresh roots take over.
Aftercare: how to help roots regrow fast
For the next month, a calm, even routine helps.
- Keep the compost evenly moist, not sodden. Check more often, as water now reaches the centre better.
- Hold off on liquid feed for 2–3 weeks, then restart at half strength.
- If it is an outdoor container, give a little temporary shade in very hot weather.
- Remove any flowers or developing fruit from very tired plants so they can prioritise root recovery.
Many gardeners notice that plants which had stopped growing suddenly “wake up” a few weeks after this treatment, with fresher foliage and better colour.
FAQ:
- How often can I use the knife‑and‑fork method on the same plant? For most container plants, once every 1–2 years is enough. Fast‑growing annuals may only need it once in their short life, while long‑lived shrubs in tubs might benefit every couple of seasons instead of constant pot‑ups.
- Is this really better than simply moving to a bigger pot? Both have their place. Moving to a larger pot gives extra compost volume but can lead to oversized containers that stay wet and heavy. The knife‑and‑fork rescue keeps plants compact, refreshes root growth, and saves space and materials when upsizing is not ideal.
- What if the roots are brown and mushy rather than white and firm? Mushy, dark, foul‑smelling roots suggest rot rather than simple congestion. In that case, reduce watering, remove all affected roots with sterilised tools, and use a very free‑draining mix. Address drainage issues before considering this method.
- Can I do this on plants that are in full flower? You can, but it is a bigger shock. If possible, wait until flowering has finished or, at least, trim off some of the blooms so the plant has fewer demands while it repairs its roots.
Comments
No comments yet. Be the first to comment!
Leave a Comment