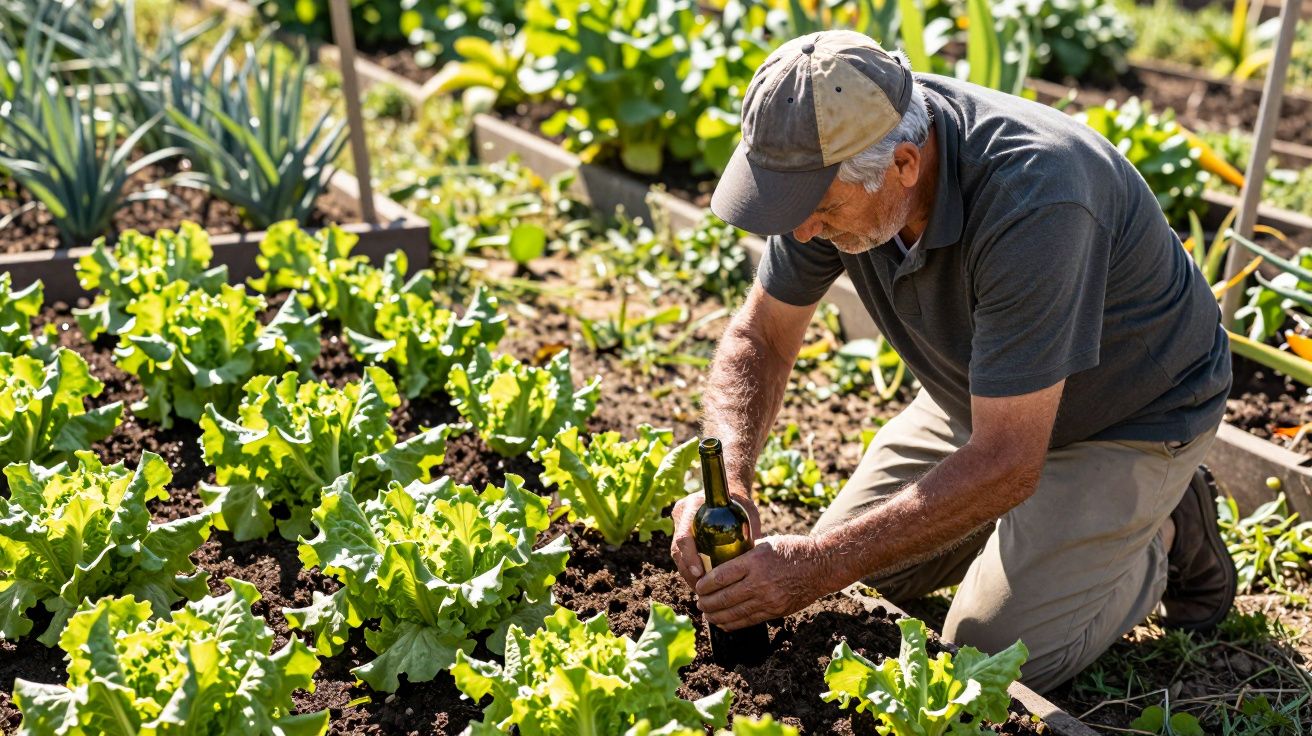
On a hot, wind‑scrubby afternoon at the allotments, I walked past a bed that broke the rules. Everyone else’s soil had crusted into cracked plates, beet leaves drooping like they’d given up. But in one corner plot, the compost looked dark and calmly damp, no puddles, no hard pan. A row of lettuces sat upright as if it had rained only for them.
It took me a minute to spot the reason. Between the plants, half‑buried and clouded with lime scale, were upside‑down wine bottles, necks sunk into the bed like strange glass mushrooms. Every so often a small stream of bubbles slipped up through the bottle, then stopped. The soil drank, then told the bottle to wait. It was irrigation by quiet negotiation.
The keeper of the plot, an older man with a sun‑bleached cap, shrugged when I asked. “Been doing it for years,” he said. “Keeps it moist right down where the roots are. No swamp on top, no splitting when it finally rains.” He’d learned it from someone else, decades back. The method is simple, a little eccentric, and brilliantly kind to compact soil that hates a sudden drench.
Why compact soil hates your watering can
Compact soil looks thirsty but behaves like it’s in a foul mood. The fine particles sit so tight that air and water have barely any room to move. When you slosh a can over the surface, the first splash often just beads and runs off, especially if the top has dried into a pale, hard crust.
Then comes the second act: once water finally forces its way in, it has nowhere to go but down in fast channels or sideways into any cracks. Puddles form, roots sit in stale, airless pockets, and the top dries into concrete again by tomorrow. Plants get the worst of both worlds - drought and waterlogging in the same week.
Old allotment keepers quietly fix the physics instead of fighting it. They don’t just add more water. They change how and where it arrives.
The wine‑bottle trick that waters from the inside out
The wine‑bottle method turns a spare bottle into a slow, buried reservoir. Instead of soaking the surface, you let water seep out underground at roughly the pace the roots can use it.
Here’s the simple version of what’s happening. You fill a bottle, flip it upside down, and bury its neck a few inches into the soil. At first, some water rushes out, then the soil packs gently around the opening. As the soil right at the neck becomes saturated, air can’t easily slip back up into the bottle, so the flow pauses. As nearby roots drink and the soil dries a little, tiny gaps open, a bubble of air sneaks in, more water escapes, and the cycle repeats.
The result is oddly elegant:
- The surface stays mostly dry, so you don’t get puddles or baked crusts.
- The moisture sits lower in the profile, nudging roots to grow deeper.
- The soil around the neck stays just damp enough to move, but not so wet that it compacts further.
It’s not high tech. It’s just gravity and air pressure doing exactly what you need, out of sight.
How to set it up, step by step
You don’t need special kit to try this, just a bottle, a spade and ten spare minutes.
Pick your bottles.
Any wine bottle will work; dark glass keeps algae at bay and looks less glaring in the bed. For smaller plants or pots, beer bottles or olive oil bottles are fine. Avoid very thin, flimsy glass.Loosen the soil first.
Use a hand fork to gently break the top 10–15 cm of compact soil. You’re not double‑digging, just lifting and crumbling enough that the bottle neck won’t sit in a brick.Make the hole.
Push a trowel or dibber down to roughly the depth of the bottle neck and shoulder, close to but not touching the plant’s root ball. Aim for 10–15 cm away from the stem for things like tomatoes, peppers and courgettes; nearer for salads.Fill the bottle fully.
Top it to the brim with water. You can add liquid feed occasionally, but go weak - the roots will be in close contact for days.Invert and press in.
With one hand over the mouth, flip the bottle, push the neck into the hole, then firm the soil snugly around it. Remove your hand and watch: a short glug of bubbles is normal. The flow should then slow to the occasional burp.Watch the first hour.
If the bottle empties in minutes, the soil is too loose or the neck isn’t well sealed with earth. Pack more soil around the opening or move to slightly firmer ground. You’re aiming for a slow release over 2–5 days, not a fast pour.Repeat between plants.
One standard wine bottle comfortably supports a large plant or a cluster of smaller ones in a 30–40 cm radius. For longer rows, stagger bottles down the line like stepping stones.
Let’s be honest: nobody repositions bottles perfectly every week. Even a handful, parked beside your hungriest plants, makes a visible difference.
Where this method shines (and where it struggles)
The wine‑bottle trick is especially helpful when:
- You garden on heavy clay that bakes in sun and smears in rain.
- Beds are raised and dry out at the edges first.
- You’re dealing with big, thirsty crops - tomatoes, cucumbers, squash, dahlias.
- Hosepipe bans make you count every can.
It’s less useful when:
- Soil is already light, friable and well mulched - you may barely need it.
- Beds sit in a low, soggy part of the plot that never really dries.
- Frost is due; water‑filled glass left proud of the soil can crack in a hard freeze.
You can adapt the idea, too. Terracotta watering spikes designed to take a bottle neck create an even gentler seep and are kinder to roots in very loose compost. If you’re avoiding glass, sturdy plastic bottles with a few pinholes near the cap, buried cap‑down, mimic the effect surprisingly well.
A tiny routine that saves water and plant stress
Old hands on the allotment tend to build these things into quiet rituals. They refill bottles while topping up the water butt or doing the slug patrol. They know which plant droops first and park a bottle there without thinking.
There’s a small pride in lifting a lettuce and feeling the soil cool and damp a knuckle down, even after a bright, drying wind. It’s fewer cracked tomato skins from sudden soakings, fewer evenings spent staring at baked beds wondering if you dare water again before the rain that never comes.
One neighbour summed it up as we watched the light bounce off his scout of green bottles.
“Sprinklers wet the top. Bottles look after the roots. Roots are where the plant lives.”
You don’t have to convert the whole garden. Try it on one bed, or with that row of tomatoes you secretly care about most, and see how the soil behaves.
| Key point | Detail | Why it helps you |
|---|---|---|
| Water seeps below the surface | Bottles release slowly into the root zone, not across the top | Soil stays evenly moist without puddles or crusts |
| Roots grow deeper | Moisture sits lower, drawing roots down | Plants cope better with hot, dry spells |
| You use less water | Refills every few days instead of daily soakings | Kinder to your back, your bill, and the water butt |
FAQ:
- Will the wine‑bottle method fix awful compact soil on its own?
No. It works best alongside basic improvements like adding compost and mulching. Think of it as a clever way to water while you slowly build better structure.- How often should I refill the bottles?
In average UK summer weather, expect every 2–4 days. In very hot, windy spells you may top up daily; in cool, damp weeks they’ll last longer.- Won’t plant roots grow into the bottle neck and block it?
They sometimes explore the opening, but because the neck is small and the flow is intermittent, full blockages are rare. If a bottle stops emptying, lift, clear the neck, and re‑set.- Is it safe to leave glass buried in the bed?
If bottles are fully intact and sunk firmly so just the base shows, the risk is low. If you share the plot with children or pets, or you’re clumsy with a fork, consider plastic bottles or terracotta spikes instead.- Can I do this in containers and window boxes?
Yes, but use smaller bottles and keep them closer to the edge so you don’t displace too much compost. Test the flow once; pots drain faster than beds.


Comments
No comments yet. Be the first to comment!
Leave a Comment