A frayed charging cable usually looks like bad luck or cheap plastic. In most cases, it’s neither. It’s a design compromise: a stiff plug, a flexible wire and a weak point exactly where the two meet. Bend that same spot hundreds of times a month and the outer jacket gives up first, then the copper follows.
Repair techs have a quiet fix borrowed from another era of everyday objects: the old fountain‑pen spring. Slip a small coil of metal over the weakest part of the cable and you turn a sharp kink into a gentle curve. The materials haven’t changed, but the way they flex has-and that’s often enough to make a cable last twice as long.
You don’t need a workshop, soldering iron or special kit. You do need one dead pen, five minutes and a bit of care.
Why your charging cable keeps dying in the same place
Most modern cables fail at one of two points: just behind the phone connector, or just behind the USB plug on the other end. That’s where the stress concentrates whenever you plug in, unplug, twist the cable on the sofa or stuff it into a bag.
Under the soft outer jacket, thin copper conductors carry power and data. Repeated tight bends work the copper back and forth until it hardens and cracks, a process engineers call metal fatigue. The outer jacket then splits, the cable kinks more sharply, and the damage accelerates.
Manufacturers try to slow this with a short rubber “strain relief” moulded onto the plug. On cheaper or older cables, that relief is too short, too stiff or missing entirely. The result is familiar: exposed wires, intermittent charging and a bit of tape that never really fixes anything.
Protect the bend, not just the break. Small changes to how a cable flexes can add months of extra life.
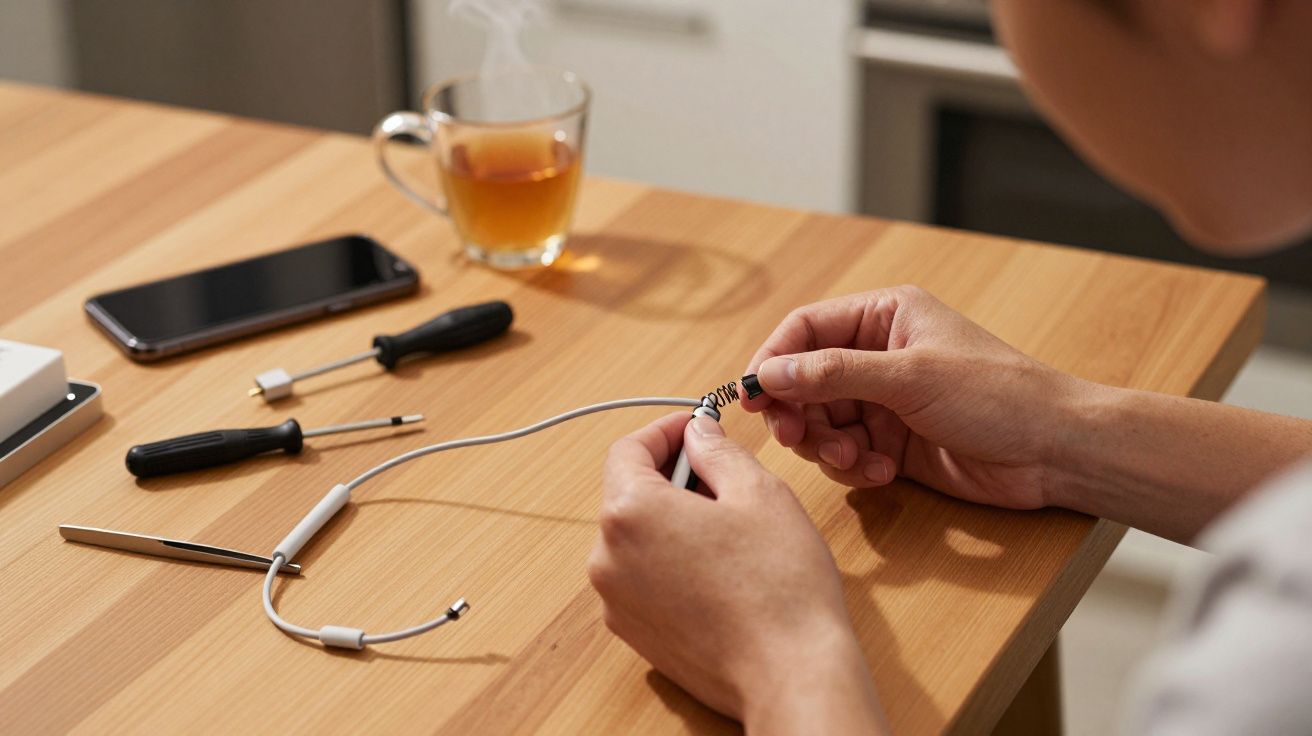
The fountain‑pen spring trick
Old fountain pens had a similar problem. The area where the nib unit met the barrel was prone to cracking if you pressed too hard or dropped the pen. Makers hid a small spring or coil inside that joint to spread the force over a longer distance and keep the plastic from snapping.
Repairers now borrow that principle for cables. Instead of reinforcing a pen barrel, you reinforce the few centimetres of wire that take the most abuse.
A slim metal spring acts like a flexible exoskeleton. It resists sharp bends but still allows the cable to curve smoothly. When the cable tries to kink at a right angle, the spring takes some of the load and forces the curve to spread out. Less strain per millimetre, less fatigue in the copper.
You can buy purpose‑made “cable savers” that copy this idea, but a spring from a click pen or old fountain pen works just as well, and you probably already own one.
How to add a spring to your cable
You can do this in a few minutes on a kitchen table. Work with an undamaged cable; if you can already see bare copper, retire it rather than reinforce it.
Find the right spring
- Look for a slim, reasonably stiff spring from:
- A retractable ballpoint pen
- An old fountain pen cap or barrel
- A retractable ballpoint pen
- The inner diameter should be just large enough to slide over your cable jacket with a bit of friction.
- Look for a slim, reasonably stiff spring from:
Clean and straighten the cable
- Unplug both ends.
- Run the cable through your fingers to remove twists and kinks.
- Wipe any grime away with a slightly damp cloth and let it dry.
- Unplug both ends.
Start from the plug end
- Choose the end that sees the hardest life-usually the phone or tablet connector.
- If the plastic strain relief is quite chunky, you may need to start the spring a few millimetres further back.
- Choose the end that sees the hardest life-usually the phone or tablet connector.
Thread on the spring
- Pinch the first coil between thumb and forefinger and twist it gently onto the cable like a screw thread.
- Keep the cable straight as you work the spring along; avoid forcing it or you risk nicking the jacket.
- Slide the spring so it overlaps the strain relief and extends 2–3 cm down the cable.
- Pinch the first coil between thumb and forefinger and twist it gently onto the cable like a screw thread.
Seat and check the fit
- Bend the cable gently near the plug.
- You should feel smooth resistance from the spring and see a wide, even curve rather than a tight kink.
- If the spring slides too easily, wrap a single layer of thin tape under its far end to act as a stop (not over the whole thing).
- Bend the cable gently near the plug.
Repeat on the other end (optional)
- If you regularly plug and unplug at the USB side as well, add a second spring there.
- For cables that live in a bag, protecting both ends pays off quickly.
- If you regularly plug and unplug at the USB side as well, add a second spring there.
Once fitted, the spring simply stays put. There’s nothing to re‑tighten or adjust. You charge as usual, but the cable now “wants” to bend over a broader arc.
Where it helps most (and where it doesn’t)
The spring trick works best on slim, round cables with a reasonably soft jacket. Think:
- Phone and tablet charging leads
- USB‑C laptop chargers with thin detachable cables
- Earbud cables (if the spring is very light and short)
It’s less useful on very thick, reinforced power bricks or braided, extra‑stiff “rugged” cables. Those already have heavy‑duty strain relief built in, and a pen spring may not grip well enough to matter.
Importantly, the spring is not a repair for:
- Cables with cracked or exposed copper
- Plugs that feel loose, hot or smell of burning plastic
- Damaged mains leads on kettles, heaters or other high‑power appliances
Those belong in e‑waste, not under a metal coil on your bedside table.
Habits that quietly double cable life
The spring is a mechanical fix, but behaviour matters just as much. Small changes in how you treat a cable can rival any accessory.
Everyday tweaks that actually stick
Avoid 90‑degree bends at the plug
Let the cable loop gently rather than forcing it straight down from the phone on the sofa arm.Unplug by the plug, not the wire
Grip the plastic housing, not the cable itself. Pulling the wire tugs directly on the weak point you’ve just reinforced.Stop “wrapping tight and tucking”
That neat figure‑of‑eight around your charger brick looks tidy but bakes in hard bends. Use loose loops the width of your palm instead.Keep heat and pressure down
Don’t trap the cable under a laptop, mattress or chair leg. Warm plastic fatigues faster, and crushed cables kink in the same place each time.Give travel cables a small case
A soft pouch or glasses case stops the connector from drilling into the same bend in your rucksack every commute.
A simple way to think about it: your cable should curve, not crease. Anywhere you see a sharp angle, ask how you can soften it.
Common mistakes vs better habits
| Common habit | Swap it for |
|---|---|
| Yanking the lead out by the wire | Pinching the plug body with thumb and forefinger |
| Coiling tightly round a charger brick | Loose palm‑sized loop secured with a soft tie |
| Letting the phone dangle off the bed on the cable | Resting it on a bedside or window ledge within easy reach |
When to stop nursing a cable and replace it
There is a point where repair tricks and careful coiling stop being clever and start being risky. If you notice any of the following, retire the cable:
- Visible copper strands or greenish corrosion near the plug
- Burn marks, melting, or a rubbery smell after charging
- Random disconnects when you barely move the connector
- The plug feels unusually hot to the touch (warm is normal; hot is not)
Lithium batteries draw significant current, and damaged leads can arc or overheat. A replacement cable usually costs less than a takeaway coffee. It’s not worth gambling on one that already looks tired.
When a cheap pen spring beats a “premium” cable
There’s nothing wrong with buying a well‑built cable with thoughtful strain relief. Many last far longer than the bundled original. Yet even premium options will fail early if they are bent sharply, sat on and yanked dozens of times a day.
A salvaged spring gives you most of the benefit of those reinforced designs for almost nothing. Combine it with gentler daily habits and you shift cable replacement from “every few months” to “every couple of years” for many households.
Your drawer of dead chargers doesn’t prove you’re unlucky. It just shows where the design hands off responsibility to you. A tiny coil of metal, borrowed from the age of ink and paper, quietly takes some of that load back.
FAQ:
- Will adding a spring stop all cable damage? No. It reduces strain right behind the connector, which is where many failures occur, but cables can still fail from cuts, crushing or internal manufacturing faults. Think of it as a strong guard at the most common weak spot, not a magic shield.
- Can I use tape instead of a spring? Tape alone adds very little structural support and often peels, trapping dirt and moisture. If you use tape, let it act as a stop for the spring rather than as the main reinforcement.
- Is this safe to use with fast chargers and high‑wattage USB‑C leads? Yes, provided the cable is in good condition to begin with. The spring does not carry current; it simply reshapes how the cable bends. Always retire any lead that runs hot or shows visible damage.
- Does this trick void my warranty? Most cable warranties focus on electrical failure, not cosmetic changes. Sliding a removable spring on the outside is unlikely to matter, but if you’re worried about a high‑end branded cable, check the small print before modifying it.


Comments
No comments yet. Be the first to comment!
Leave a Comment